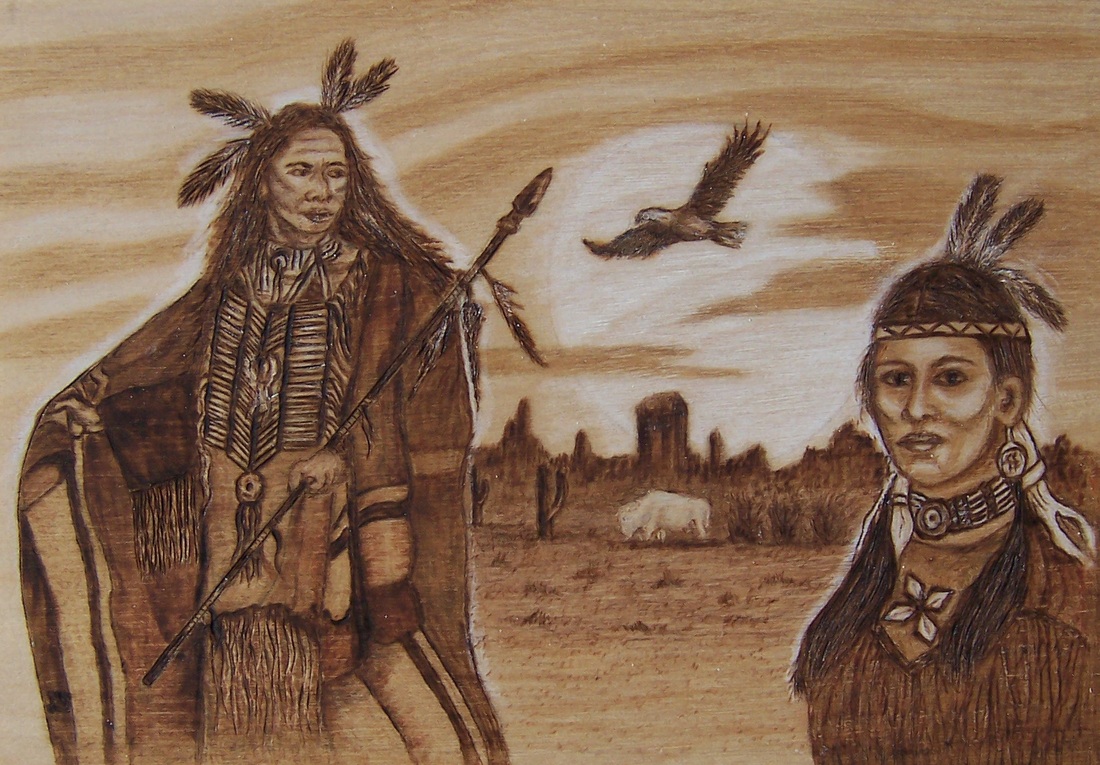
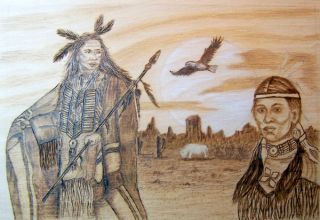
Native American Couple
Hello Everyone!
I'm going to post my first WIP (Work in Progress). I will be explaining everything I'm doing step-by-step for those that are new to burning.
It's going to be a 5" x 7" Native American picture...so I've started working on it today...still getting the pattern laid out on the wood before transferring it. I'm hand-drawing in things like extra feathers, the spear with feathers, her headband, more feathers etc.
If you should have a photo that you took, and you want to turn it into a burning, you can simply scan it onto your computer hard drive, then print it out in the size you want it to be.
I'm making a tutorial out of it, so I thought you might be interested in what it takes to create a wood burning.
I picked a piece of birch plywood because I love how the grain flows in it....you'll see how I make the clouds by following the grain later on.
Next step is to sand the wood very smooth...(NOTE...always sand in the direction of the grain). I cannot stress the importance of this step enough...sanding it smooth will make it easier to use your wood burning tips.
I start out using a fine 250 grit sandpaper, followed by a 400 grit and then by a 600 grit. I then take a brown paper lunch bag and I "buff" the wood just as if I were sanding it again. The brown paper smooth's down any grain that still remains so that it will feel baby smooth now. Next, I take a paper towel or a cotton T-shirt to remove the fine dust created by sanding.
Once the wood has been sanded and wiped down, it's time to transfer the pattern onto the wood. This can be done several ways. I usually transfer a pattern using Walnut Hollow Graphite Paper. There are several other types of transfer paper available, but NEVER use Carbon Paper! It is very hard to erase it on wood. Sometimes I hand draw a pattern onto the wood.
I tape the pattern onto the wood where I want it, usually using 2-3 pieces. The tape I use is purple Duck tape (www.duckproducts.com) which I bought at Lowes or other home improvement stores. It offers a quick release, much like sticky notes, as it won't tear the paper or photo, etc. that is taped down.
Next, I place a piece of Graphite Paper under the paper pattern...(make sure the shiny side is facedown on the wood), if it isn't.. you'll find that you are transferring the pattern onto the back of the paper instead of the wood. I can't tell you how many times I've done that. LOL!! You don't tape the graphite paper down...you leave it free moving so you can lift it up and see how you are doing.
Once you have it all set up you can start tracing over the lines of the pattern using a red ink pen. Actually, you can use any color, but I like the red. Why use red ink? It helps show you what you have already traced and what you still need to trace.
After a few strokes, lift up the pattern to make sure it's transferring onto the wood and that it is dark enough to see it. You don't really need to press down very hard, but if you find it transferred too dark, I always take an eraser (I use Sanford-Prismacolor-Magic Rub White Eraser) and rub it over the whole picture gently to remove dark lines. It won't erase everything...it just lightens it up.
When you finish tracing the pattern check it over to see if you traced everything onto the wood. DON'T remove the pattern, instead, just flip it over onto the back of the wood leaving the tape on it. This way, if you missed something, all you have to do is flip it back over and it will be in the correct alignment to trace what you missed.
Now that the pattern has been traced onto the wood it will look like this...(see picture below).

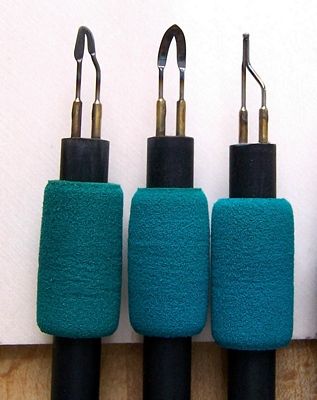
I'd like to cover a few items before I get started. The burner I use is the Optima 1 dual burner. It allows me to have two pens hooked up to the burner, but you can only turn one side on at a time. I bought the dual burner because it saves me time from switching out my pens.
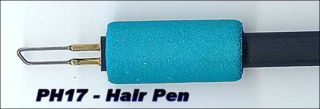
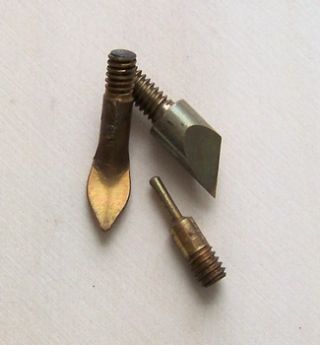
I basically use 4 pens: The round healed skew; the spear point bent shader; the 1/16" ball tip pen; and the hair tip pen. These pens are all from Optima. You can easily find similar pens manufactured by other companies. See photos below...now if you have a single temperature pen, I have also included a picture of the tips for the single temp burner that would match up to my pens. Click on photos below to enlarge them.
Now for some advice:
Have a practice piece of wood next to you...preferably a piece of the same type of wood you are burning at that time. You will use this practice piece to test the heat of your pen. Test by drawing a line on the practice wood...is it too hot? Not hot enough? Adjust your burner to a heat setting that you want.
You should also practice how to use your shading tip...you need to keep your pen tip in motion, otherwise you will get a dark blob when you first touch down. I pretend my pen is an airplane coming in for a landing...touch down and keep moving across the wood and then take off at the end as if the plane is lifting off into the air.
For those who have single temp units...your hand speed will determine how light or how dark your burning will be. Slow down and you'll get a darker burn mark...speed up you'll get a lighter burn mark.
Keep your tips clean!!!
If your tip starts dragging across the wood you need to clean it. A clean tip lets you glide across the wood and produces an even tone. I rub my tips across a razor blade to get the carbon off. You can also run it across a piece of denim jeans. When I'm done burning I like to use a leather strop with some jewelers polishing compound on it to clean my tips so they will be clean and ready when I start burning again.
Safety is important!!
Make sure you set up in a well ventilated area with good lighting. It helps to tilt your work on an angle to allow the heat and smoke to rise away from your hand and fingers. You've probably seen my table top easel located at the top right hand corner on The Woodburner...this easel will tilt your work to keep the heat and smoke away, and it allows your hand to work at a natural angle. Click on the link to find out all the benefits it offers.
The type of wood I use is Basswood, Italian Poplar, Aspen, and Birch Plywood.
Never burn on treated, sealed, or stained wood. There are woods that are toxic to burn on...Google "toxic woods" for a list.
If you make a mistake while burning...it is easy to correct. I use a utility knife razor blade to scrape away any problems. I prefer this method over sanding the mistake...sanding seems to "muddy" the work. Razor blades can also be used to pick out highlights in eyes, hair, fur, feathers, etc.
Well, it's time to start burning. Whoo Hoo!
First thing to do is Wash Your Hands! Why, you might ask? Well our hands have a natural oil to them...sometimes this oil gets transferred to the wood.
Here is a picture of my studio....
First thing to do is Wash Your Hands! Why, you might ask? Well our hands have a natural oil to them...sometimes this oil gets transferred to the wood.
Here is a picture of my studio....
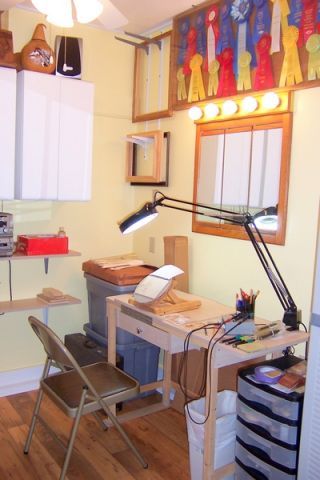
My Home Studio
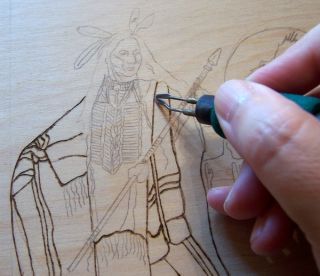
Lets get started....I normally say not to "outline" anything, but in this instance I'm starting out by outlining the mans blanket...when I shade it will have a softer look as my shading will blend in with the outline. I outlined it to give me a starting point for my shading as I place my tip on the line working from dark to light. The line will take the first stroke of heat and then it will lighten up as I pull it towards me. I am using the skew for this...
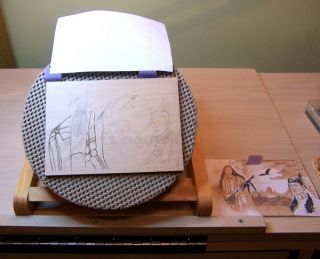
Here is another picture showing the outline of the piece on my easel. Next to it you'll see my reference photo. Notice I've still got my pattern paper taped to the wood in case I missed tracing something.
In the next photo you'll see I have begun shading the robe and I am using the shading tip point to outline the shield on his chest.

I have already shaded his robe which I do in layers. In this next picture I am adding another layer of shading. I shade from dark to light. I pull the shading tip towards me.
See how the part I'm shading is darker than the bottom portion? Here is a close up of what I have done so far....notice the different levels of shading.

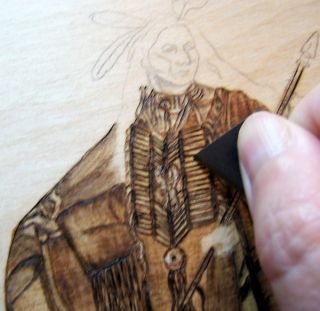
Well, I've finished his clothing so I'll describe what I've done today. I used my skew to start putting in some of the fringe.
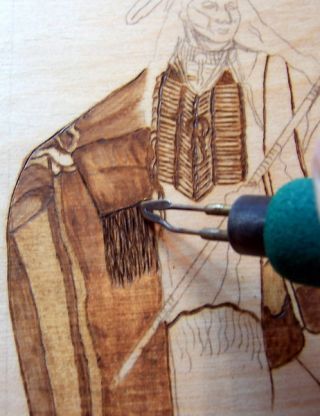
Next, using my shader I started to shade his robe. The wood I'm using has a lot of grain to it...so my shading may look uneven here. I just keep going back over it with the shader until I'm satisfied with the tone.
One thing I need to mention to those who are just starting out. I hold my pens much like I hold a pencil. When I first started I would put a lot of pressure on my tip which indented the wood. You want to let the heat of the pen burn the wood...not "into" the wood. Remember, you aren't trying to get the shade you want the first time out...you want to layer it to get the shade.
How to do a straight line? When I first started out I didn't know how to deal with a straight line. I knew I couldn't use a wood ruler because it would burn it. So then I thought ah ha!...I'll use a metal ruler...wrong! The heat from the pen was absorb by the metal. What to do? What to do?
Well this is my method of dealing with straight lines...when I'm tracing the pattern using graphite paper onto my wood, I use a ruler to trace any straight lines onto the wood. This gives me a visual straight line to start out with.
When it's time to burn the straight line I put my burner on very low heat. Now I get my skew. With this little amount of heat it allows me to trace over the line without adding any tone to the wood. It cuts into the wood just a little. This allows for me to turn up my heat and place the skew tip into the line and start burning it in.

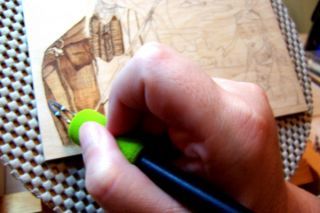
I'm using my shading tip to draw in a look of "roundness" to a fold in the clothing below. I take my tip and place the edge on the line and pull my tip sideways with a hint of a slight round arch. See picture below...
Let's talk about highlights!
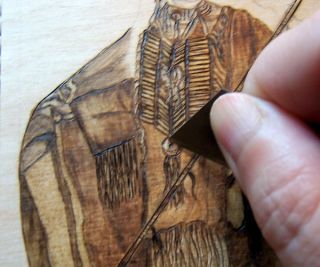
When I first started out I use to really, really, pay attention to my highlights and would make sure that I didn't burn over them. If they are in a small area I don't worry about covering them. Why? Because I can take my trusty razor blade and scratch/pick them out.
Here are some examples....
When I first started out I use to really, really, pay attention to my highlights and would make sure that I didn't burn over them. If they are in a small area I don't worry about covering them. Why? Because I can take my trusty razor blade and scratch/pick them out.
Here are some examples....

The picture below shows where I left off ....

Next, I started burning his hair using the hair pen. I started out light and kept adding layers upon layers.
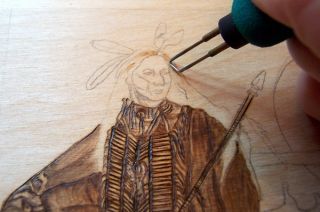
After I finished his hair I used my shading tip to put in his eyebrows, eyes, nose, and lips. Then I shaded his cheeks and put a couple of stripes of paint on his face.
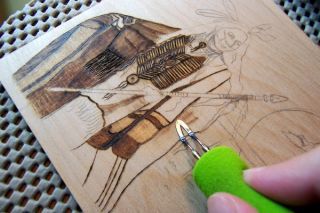
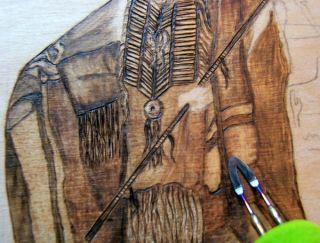
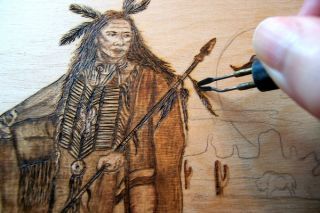
Next, I used my skew to burn the feathers on his head.
I also used the skew to burn the feathers on his spear.
Next, I used my skew to start burning in the feathers on the eagle.
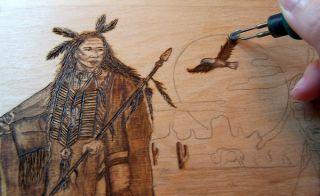
Took my shading tip to burn the cactus.

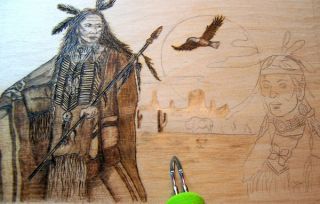
This is what it looks like now...

Next I started shading the background. I used my bent shading tip to do all the shading today....started shading the ground and a little on the mountains. I used side to side motions on the ground following the grain. See below...
A little more on the mountains...I'd start at the top or peak of the mountain with my shader and pull downward with my strokes.
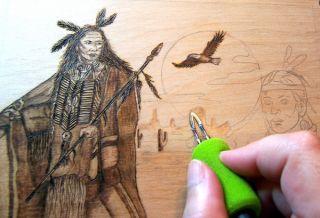
Still have more shading to do on the mountains, etc. You'll notice the foreground has some tall tufts of grass.
I also started shading the clouds in using side strokes following the grain. The design of the grain makes it easy to follow when doing the clouds.

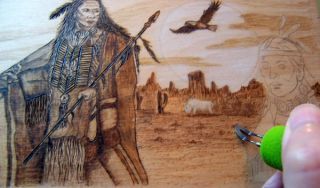
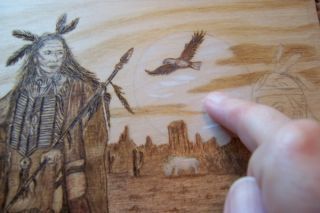
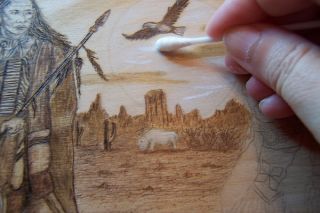
Next I detailed the white buffalo in, and added some white pastel to the buffalo and the moon to get the feeling of the sky.
I use an artist grade soft white pastel...Don't use white chalk as it doesn't blend well on wood. See below...
Don't worry if you can't find the Rembrandt name, any quality artist grade soft white pastel will work.
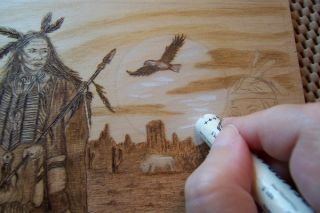
OK...pastel tutorial... all you need to do is make a few marks where you want your color to go. Then blend them in either with your finger or Q-tip. Keep adding the pastel until you get the shade of color you want.
I usually add the color after all my burning is done. The reason for this is because after I put one coat on, I spray it with Deft (one light coat). After it dries, I put another layer of white down and keep doing this same procedure over and over until I get the color depth I want. However, because I wanted to see how it was going to look, I did some white on the moon.
Look at photos below...
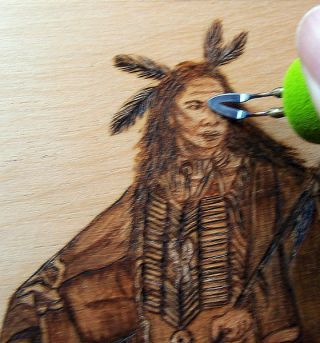
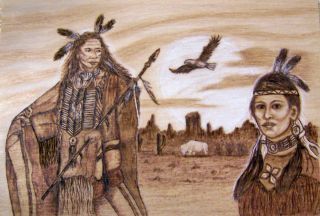
Are you all ready to see some more??? I started out doing the female...I did her necklace using the tip of my shader.
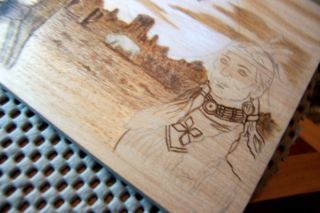
I am now using my hair pen to start on her pig tails...see below.
I shaded in her eyes with the tip of my shading pen...did her eyebrows, nose, mouth, chin, ear all with the shading tip.
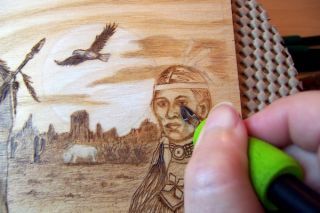
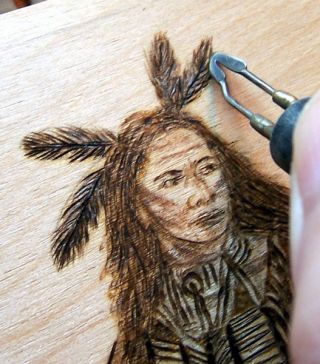
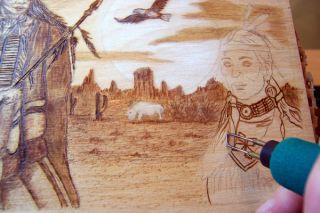
The pic below shows me shading her cheek with my shading tip.
I'm using the hair pen again to start to darken up her hair. I also used the hair pen to put the fringe on her dress. I'm not happy with the fringe so I might be playing around with it later.
I'm darkening up her necklace and other areas that needed to be darker.
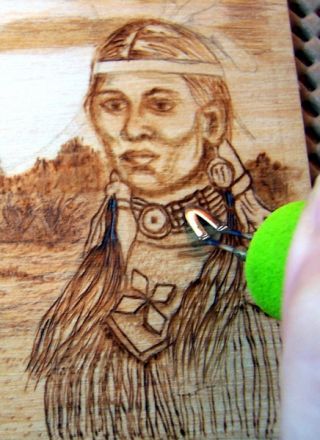
This is how far I got today...need to darken her hair on the top of her head, put the feathers in her hair...do her head band, etc.
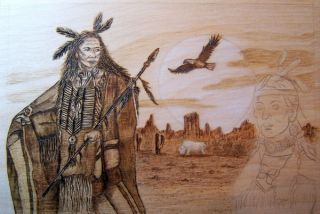
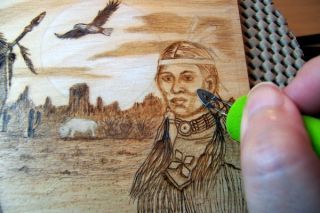
Well, I'm nearing the finish line....Whoo hoo!!! I rounded out her face a little, added the feathers on her head, shaded her hair some more, put a design on her head band, shaded the mountains more, darkened her dress and, instead of her eyes looking outward, I have them looking towards us.
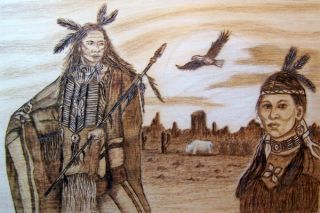
I know there will be more shading to do and some tweaking, but I'm near the finish line.
Now I'm at the point where I set it aside for a couple of days in a place in my house that I pass a lot. This lets me see it whenever I go by and helps me to pick out things I might want to change. I leave a piece of paper in front of it and write down things I notice. Then a couple of days later, I take the piece of paper and examine what I wrote down, and if I still feel the same way I'll make changes to the piece.
I'll be back in a couple of days to show any changes I've decided to make.
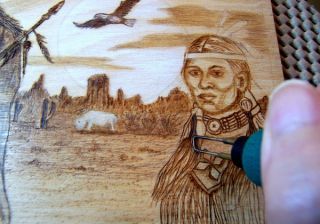
Well, I finally found some time to do some tweaking on my Native American Tutorial. I used my bent spear shader to tweak everything mentioned. I reshaped the Buffalo and added a little more white pastel to it.
Next I worked on the woman's face. I reshaped it thinner, reshaped her cheekbones and added some white pastel to highlights on her face.
I added a slight halo effect around both the man and the woman as a highlight from the bright moon.
I want to thank everyone for your kind comments about my work. I'm happy that you will use this to refer to in the future.
"Keep burning and learning™ ©"